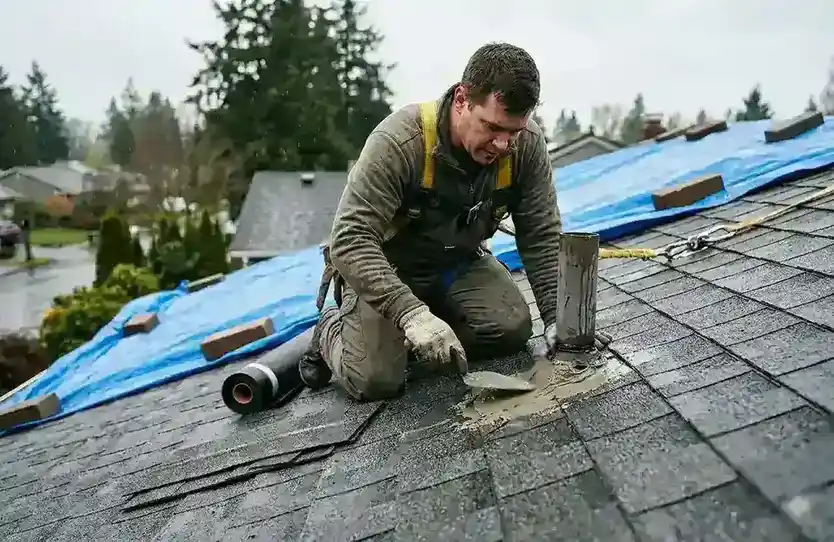
A roof leak can turn from a small drip into ceiling stains, soaked insulation, damaged drywall, and mold risk faster than many homeowners expect. If rain is coming through your roof right now, your first goal is simple: reduce water damage inside the home,emergency roof leak repair stay safe, and use a short-term fix until a professional roofer can inspect the real problem. For homeowners in Greeneville, TN, roof leaks are often linked to heavy rain, wind damage, worn shingles, flashing problems, fallen branches, or storm damage. We will tell you how to temporarily fix a roof leak without making the damage worse, while also helping you know when it is time to call Covenant Roofing & Restoration for a proper roof repair, storm damage inspection, or full roof replacement.
Quick Answer: How to Temporarily Fix a Roof Leak
The fastest way to temporarily fix a roof leak is to protect the inside first, then stop or slow the water entry if it is safe to do so. Move furniture and electronics away from the leak, place buckets and towels under active drips, and turn off electricity if water is near outlets, lights, or wiring. If the roof can be reached safely, cover the damaged area with a heavy-duty tarp, wet-patch roofing cement, waterproof roofing tape, plastic sheeting, or tar paper depending on the leak size. If the roof is wet, steep, storm-damaged, or unsafe, stay inside and control the water from the attic until a licensed roofing professional arrives.
A temporary roof leak fix is never a permanent repair. Roofing tape, roofing cement, tarps, plastic sheets, and bucket systems can buy time, but they do not solve the root cause. The real leak may come from damaged shingles, cracked flashing, exposed roof decking, loose vents, pipe boot failure, or hidden storm damage. That is why a short-term patch should be followed by a professional inspection, especially in Greeneville and nearby East Tennessee areas where heavy rain and wind can quickly expose weak roof areas.
Before You Touch the Roof: Protect the Inside First
Before climbing a ladder or trying any outside repair, focus on the part of the home already being damaged. Interior protection matters because water often spreads across ceilings, insulation, walls, floors, and electrical areas before you find the actual leak source. A roof leak may look small at first, but if water keeps soaking into drywall or wood, the damage can become more expensive than the roof patch itself. This is why your first few minutes should be used to control water inside the house.
Move Furniture, Electronics, and Valuables
Move couches, beds, rugs, tables, electronics, family photos, documents, and other valuables away from the leak area. If you cannot move large furniture, cover it with plastic sheeting, a waterproof tarp, or thick towels. Water can stain fabric, damage wood finishes, ruin flooring, and create electrical hazards if it reaches power strips or plugged-in devices. In a bedroom, living room, or attic space, even a slow drip can spread wider than expected once it hits insulation or ceiling texture.
For Greeneville homeowners, this step is especially important during heavy rain or windstorms because the leak may continue for hours before the weather clears. Do not wait until the ceiling stain grows. Protect the room early, then work on catching and redirecting the water.
Place Buckets, Towels, or Plastic Sheeting Under the Leak
Place buckets, bowls, storage bins, or deep containers directly under active drips. Put towels around the containers to catch splashes and prevent water from spreading across the floor. If the drip is falling from a ceiling fan, light fixture, or electrical area, do not stand under it or touch it. Water and electricity are a serious safety risk.
For larger leaks, plastic sheeting can help guide water into one container. Tape or secure the plastic so it slopes downward into a bucket. This simple setup can reduce floor damage and make cleanup easier. If you have multiple drips, use several containers and check them often so they do not overflow.
Release Water From a Bulging Ceiling Safely
If the ceiling is bulging, sagging, or bubbling, water may be trapped above the drywall. This can lead to a sudden ceiling collapse. Place a bucket underneath the lowest point of the bulge, then carefully make a small puncture in the center using a screwdriver or similar tool. This allows the trapped water to drain in a controlled way instead of bursting across the room.
Do this only if you can stand safely, keep away from electrical fixtures, and control the area below. If the ceiling is heavily sagging, cracking, or near lights and wiring, avoid touching it and call a professional. A sagging ceiling is a warning sign that the leak has moved beyond a basic drip.
Dry the Area With Fans and a Dehumidifier
After catching the water, begin drying the affected area as much as possible. Use fans to move air across wet flooring, walls, and attic areas. A dehumidifier can help pull moisture from the room and reduce the chance of mold growth. If insulation is soaked, it may need to be removed and replaced later because wet insulation can hold moisture against roof decking, rafters, and drywall.
Drying does not fix the roof leak, but it helps limit secondary damage. The longer moisture sits inside a home, the higher the risk of stains, odors, wood damage, and mold. Keep airflow moving until the roof has been inspected and the source has been repaired.
Take Photos and Videos for Insurance
Before cleaning everything up, take clear photos and videos of the leak, ceiling stains, wet floors, damaged belongings, attic water trails, missing shingles, fallen branches, and any storm-related damage you can safely document. Save receipts for buckets, tarps, roofing cement, roofing tape, plastic sheeting, dehumidifier rental, or other emergency materials.
This step can help if you need to file a homeowner’s insurance claim. We also offer storm damage inspection and insurance claim support for Greeneville-area homeowners, so having early documentation can make the process easier if the leak was caused by wind, hail, or storm damage.
Safety Check: Should You Go on the Roof?
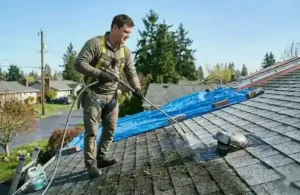
Many homeowners want to climb up and patch the leak immediately, but that is not always the right move. A wet roof can be slippery, a storm-damaged roof may be weak, and steep roof slopes can become dangerous even for people who are used to basic home repairs. The safest temporary roof leak fix is the one that prevents more damage without putting you at risk. If there is any doubt, stay off the roof. A licensed roofing professional has the ladders, safety equipment, roof anchor knowledge, and repair experience needed to inspect the damage safely.
Do Not Climb During Severe Weather
Never climb onto a roof during active rain, lightning, strong wind, hail, or icy conditions. A mid-storm leak is frustrating, but going outside during severe weather can turn a roof problem into a personal injury emergency. Even a low-slope roof can become slick when shingles, metal panels, leaves, or roof decking are wet. If the leak starts during a storm, handle the inside first. Use buckets, towels, plastic sheeting, fans, and attic water diversion if safe. Once the weather clears, you can decide whether an outside temporary patch is possible or whether you need emergency roof repair help.
Avoid Wet, Icy, Steep, or Sagging Roofs
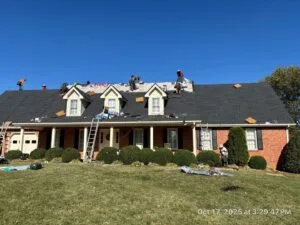
Do not walk on a roof that looks sagging, soft, unstable, or badly damaged. Missing shingles, exposed decking, large holes, fallen branches, and lifted flashing can hide weak spots. A roof that has taken storm damage may not support weight the way it normally would. Steep roofs are also risky for DIY work. If your home has a high roofline, multiple stories, metal roofing, or a sharp pitch, a temporary tarp or patch should be handled by a roofer. Covenant Roofing & Restoration serves Greeneville, Jonesborough, Chuckey, Mosheim, Bulls Gap, and nearby areas with roof repair and storm damage services, making them a safer option when roof access is questionable.
Use a Ladder, Gloves, Safety Glasses, Non-Slip Shoes, and a Spotter
If the roof is dry, low-slope, and safe to access, use proper safety gear. Set your ladder on firm, level ground. Keep three points of contact while climbing. Wear non-slip shoes or boots, gloves, and safety glasses. Have another person nearby as a spotter. Avoid carrying too many materials at once, especially heavy tarps, anchor boards, sandbags, roofing cement, or tools. You may also need a wire brush, putty knife, caulk gun, screws, 2×4 anchor boards, utility knife, roofing tape, or wet-patch roofing cement. Keep tools organized so you are not moving around the roof more than necessary.
When to Choose an Interior Temporary Fix Instead
Choose an inside fix if the roof is inaccessible, the leak is happening during severe weather, the roof is too steep, or the damaged area is near a dangerous edge. An interior temporary fix may include placing plastic sheeting in the attic to guide water into a bucket, using waterproof roofing tape on a small entry point from underneath, or drying wet wood with a fan and dehumidifier. This will not stop the leak from entering the roof system, but it can reduce damage inside the home until a roofer arrives. If the water is coming through fast, the ceiling is sagging, or the leak is near electrical wiring, call for professional help as soon as possible.
Find Where the Roof Leak Is Coming From
Finding the source of a roof leak is often harder than it looks. Water does not always drip straight down from the damaged spot. It can enter through a cracked shingle, loose flashing, vent pipe, chimney area, roof valley, or nail hole, then travel along rafters, roof decking, insulation, or ceiling joists before showing up inside. This is why many homeowners patch the wrong area and the leak continues. The goal is to trace the water path safely and identify the most likely entry point. Once you know where the leak is coming from, you can choose the right temporary fix.
Check the Attic for Water Trails and Wet Roof Decking
If you can safely enter the attic, use a flashlight to look for water stains, dark marks, damp insulation, wet roof decking, and active drips. Follow the water trail upward to the highest visible wet point. That area is usually closer to the roof entry point than the ceiling stain below. Be careful where you step. Walk only on secure framing, not drywall or insulation. If the attic is dark, cramped, or wet near wiring, do not continue. Take photos from a safe position and contact a roofer.
Inspect Shingles, Flashing, Vents, Pipes, Roof Edges, and Valleys
Common roof leak sources include damaged shingles, lifted shingles, cracked flashing, loose pipe boots, roof vents, chimney flashing, skylights, roof edges, valleys, and areas where different roof sections meet. These spots handle a lot of water during rain, so even a small gap can allow water to enter. On shingle roofs, look for missing tabs, curled edges, torn shingles, exposed nail heads, loose granules, or cracks. Around vents and pipes, check for split rubber boots or lifted sealant. Around flashing, look for gaps, rust, separation, or poor previous patching.
Look for Cracks, Holes, Missing Shingles, or a Fallen Branch
Storms in East Tennessee can leave behind obvious damage such as missing shingles, fallen branches, punctures, or exposed roof decking. If a branch has hit the roof, do not assume the only damage is what you see from the ground. Impact damage can crack shingles, loosen fasteners, damage decking, and create hidden leak paths. For small cracks or holes, roofing cement or waterproof roofing tape may work as a short-term patch. For larger openings, missing shingles, or major storm damage, a heavy-duty tarp secured properly is usually the better temporary option.
Why the Drip Inside May Not Be Directly Under the Leak
A ceiling drip may appear several feet away from the actual roof leak. Water follows gravity, but it also follows wood framing, insulation, pipes, and seams. It may enter near a vent, then travel along a rafter before dripping into a bedroom or hallway. This is one reason a professional roof inspection is valuable after a temporary fix. If you patch only the ceiling area or the spot directly above the drip, the real roof problem may remain open. A roofer can inspect shingles, flashing, vents, decking, and storm damage to locate the true source and recommend whether roof repair or roof replacement is needed.
Temporary Roof Leak Fix Options by Damage Type
Once the inside is protected and you have a safe idea of where the leak may be coming from, the next step is choosing the right temporary repair method. The best option depends on the size of the leak, the type of roof damage, the weather, and whether the roof can be reached safely. A small crack near flashing may need roofing cement. A minor shingle tear may need waterproof roofing tape. A large damaged area from wind, hail, or a fallen branch may need a heavy-duty tarp. The key is to match the temporary fix to the damage instead of using the same method for every leak.
Temporary repairs should slow or stop water long enough for a professional inspection. They should not be treated as permanent roof leak repair. Water can still travel under shingles, into roof decking, and through insulation if the underlying problem is not fixed correctly.
For Small Cracks or Holes: Use Roofing Cement or Roof Sealant
Wet-patch roofing cement is one of the most common materials used for small roof leaks because it can seal minor cracks, gaps, and small openings for a short time. It is often used around loose shingles, exposed nail heads, flashing gaps, small holes, and areas where water is finding a narrow entry point. If the product is rated for wet surfaces, it may help during damp conditions, but it still works best when the area is as clean and stable as possible.
Before applying roofing cement, remove loose debris, leaves, and granules with a wire brush if it is safe. Use a putty knife or trowel to spread the cement over the crack or hole. Apply it wider than the damaged area so water cannot easily push around the edges. If the leak is near flashing, vents, pipes, or roof edges, cover the full gap rather than only the visible crack. Do not apply roofing cement over rotten decking, large holes, or areas where shingles are badly missing because the seal may fail quickly.
For Minor Shingle Tears: Use Waterproof Roofing Tape
Waterproof roofing tape or flashing tape can help with small shingle tears, minor cracks, lifted seams, and small roof openings. It is usually easier to apply than roofing cement and can be useful when the damaged area is narrow. Some homeowners also use it from inside the attic when roof access is unsafe, although an inside patch only slows water that has already entered the roof system.
For best results, press the tape firmly over the damaged section and extend it beyond the tear or crack. If the area is dirty, wet, or covered with loose granules, the tape may not bond well. Roofing tape should be seen as a short-term emergency patch, not a full repair. If shingles are torn, curled, or missing, the roof may need proper shingle replacement and sealing from a licensed roofer.
For Missing or Lifted Shingles: Slide Plastic, Tar Paper, or Rubber Sheet Underneath
If a shingle is torn, lifted, or partly missing, water can run directly under the surrounding shingles and reach the roof decking. In this case, placing material under the damaged shingle can help redirect water. Plastic sheeting, tar paper, roofing felt, or a rubber sheet may work as a temporary barrier until the damaged shingle is replaced.
Carefully lift the damaged shingle only if it is safe and flexible enough. Slide the material underneath so it extends beyond the damaged area. If fasteners are needed, use them carefully and seal nail or screw heads with roofing cement. Do not create unnecessary holes in good shingles. If the shingles are brittle, curled, or breaking apart, stop the DIY repair and schedule a professional roof repair.
For Major Roof Damage: Cover the Area With a Heavy-Duty Tarp
A heavy-duty tarp is usually the best temporary fix for large roof leaks, missing shingles, storm damage, exposed decking, fallen branch damage, or multiple leak points. A tarp can cover a wider section than roofing cement or tape, which makes it useful when you are not sure exactly where the water is entering.
Choose a tarp that extends several feet beyond the damaged area on all sides. If possible, the tarp should reach over the roof ridge so water flows over it instead of running underneath it. Secure the tarp with 2×4 anchor boards and screws rather than relying on loose bricks or lightweight objects. Loose tarp edges can catch wind and pull away, especially during storms. If the roof is too steep, wet, or damaged, do not attempt this yourself. We can inspect storm damage and help with safer temporary protection and permanent repair options.
How to Temporarily Fix a Roof Leak From Inside
Sometimes, the safest temporary fix for a roof leak from inside is done from inside the home or attic. This is common during heavy rain, at night, during strong winds, or when the roof is too steep or slippery. An interior fix does not stop water from entering the roof, but it can limit damage to ceilings, walls, floors, and belongings while you wait for professional help. Inside fixes are especially useful for Greeneville homeowners during mid-storm leaks. If water is already entering the attic, the goal is to control where it goes, keep it away from electrical areas, and dry the structure as much as possible.
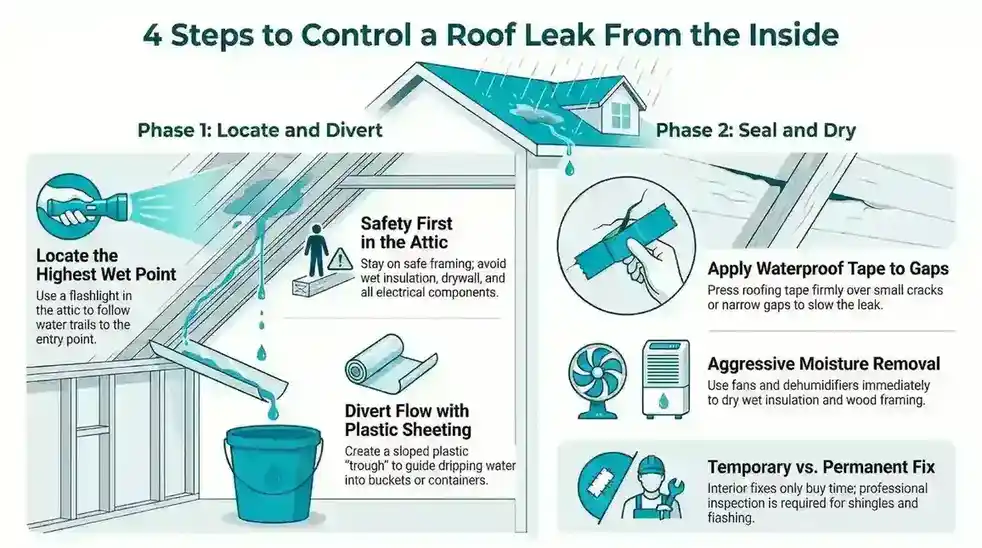
Locate the Leak in the Attic
Go into the attic only if it is safe, dry enough to move carefully, and well-lit. Use a flashlight to look for active drips, wet insulation, water stains, or dark streaks on the roof decking. Follow the water trail upward to the highest wet point you can find. That point may be close to the roof entry area. Do not step on insulation or drywall. Stay on safe framing and avoid touching wet wires, light fixtures, or electrical boxes. If the attic is difficult to access or water is near electrical components, leave the area and call a professional roofer.
Place Plastic Sheeting to Divert Water
If water is dripping through the attic, plastic sheeting can be used to guide it into a bucket or storage container. Secure the plastic so it forms a slope. The lowest point should direct water into the container. This can help prevent water from spreading across the insulation and the ceiling drywall. Check the bucket often during active rain. If water is coming in fast, use more than one container. Place towels around the area to catch splashes. This method is simple, but it can prevent a lot of interior damage when roof access is unsafe.
Use Waterproof Tape on Small Entry Points
If you can see a small crack, hole, or narrow gap from inside the attic, waterproof roofing tape may help slow the leak. Press the tape firmly over the opening and extend it past the damaged spot. This is most useful for small entry points, not large holes or widespread roof damage. Remember that water may still be trapped above the tape or traveling under shingles outside. This is why an interior tape patch should be followed by a professional inspection. The outside roof surface may still need shingle repair, flashing repair, vent sealing, or roof replacement.
Dry Wet Insulation and Wood
Use fans and a dehumidifier to reduce moisture in the attic and affected rooms. Wet insulation can hold water against roof decking and ceiling drywall, which may lead to staining, odors, wood damage, and mold risk. If insulation is soaked, it may need to be removed instead of dried in place. Drying should start as soon as possible, but it should not replace roof repair. If the leak continues after each rain, moisture will keep returning. Covenant Roofing & Restoration can help identify whether the leak is from shingles, flashing, vents, storm damage, or deeper roof system issues.
What Not to Do During a Temporary Roof Leak Repair
A temporary roof leak repair should reduce damage, not create more problems. Many emergency fixes fail because the material is too weak, the repair is placed in the wrong spot, or the homeowner works in unsafe conditions. Avoiding common mistakes can protect your home and keep the repair from becoming more expensive.
Do Not Work on a Wet Roof
A wet roof is one of the biggest safety risks in any roof leak situation. Shingles, metal roofing, moss, leaves, and roof decking can become slippery during rain. Even if the roof looks safe from the ground, one wrong step can cause a fall. If the roof is wet, wait for safe conditions or call a licensed roofing professional. During active rain, focus on interior water control instead of climbing outside.
Do Not Use Duct Tape as the Main Fix
Duct tape may seem useful in an emergency, but it is not made for roof surfaces, heavy rain, UV exposure, or rough shingles. It may peel quickly and give a false sense of protection. If tape is needed, use waterproof roofing tape or flashing tape made for exterior repair. Duct tape may help hold plastic indoors for a short time, but it should not be trusted as the main roof leak patch.
Do Not Nail Random Holes Through a Tarp
A tarp can help stop water, but poor installation can make the roof worse. Random nails through the tarp and shingles can create new leak points. Loose edges can also let wind lift the tarp and drive water underneath. If a tarp is used, secure it with 2×4 anchor boards and seal any necessary fastener points. For large storm damage, professional tarp installation is safer and more reliable.
Do Not Ignore Wet Insulation or Mold Risk
Stopping the drip is only part of the job. If insulation, drywall, roof decking, or wood framing stays wet, the home can develop odors, stains, and mold issues. Wet insulation may look normal from below, but it can hold moisture for a long time. After any roof leak, inspect the attic and affected rooms. Use fans and a dehumidifier. If moisture remains, ask a professional whether damaged material should be removed.
Do Not Treat Temporary Repair as Permanent
Roofing cement, roofing tape, tarps, plastic sheeting, and tar paper are emergency measures. They may slow the leak, but they do not always fix damaged shingles, flashing failure, cracked pipe boots, rotten decking, or storm-related roof damage. A temporary patch should be inspected soon. If the same area leaks again, the roof needs a proper repair.
How Long Will a Temporary Roof Leak Fix Last?
Temporary fixes are meant to hold until a professional roofer can address the actual damage. The lifespan depends on the material used, roof conditions, and weather exposure:
| Temporary Fix | Best For | Expected Duration |
| Buckets, towels, or plastic sheeting | Interior drip control | Immediate only, until rain stops |
| Roofing tape or flashing tape | Small cracks, attic-side patches | 24–72 hours |
| Wet-patch roofing cement | Minor cracks or exposed nail heads | 1–3 days under normal conditions |
| Plastic sheeting or tar paper | Small openings, minor shingle tears | 1–2 days |
| Heavy-duty tarp with anchor boards | Large holes, missing shingles, storm damage | Until professional repair, usually a few days to a week, depending on weather |
Even the strongest tarp or roofing cement will not stop water indefinitely, especially during heavy rain or wind. Regular inspection is necessary to ensure water is still diverted away from the interior.
When to Call a Licensed Roofing Professional
A temporary fix is never a replacement for professional repair. You should contact a licensed roofer like Covenant Roofing & Restoration immediately if any of the following occur:
- Water is pouring through the ceiling or walls.
- Ceiling or roof decking is sagging or bulging.
- The leak is near electrical wiring, outlets, or light fixtures.
- Multiple areas are leaking.
- Damage is from storm, hail, or fallen branches.
- Shingles, flashing, vents, or roof decking are badly damaged.
We provide emergency storm inspections, temporary protection, full roof repairs, and insurance claim assistance for homeowners in Greeneville, TN. Their team can ensure the leak is correctly located and permanently repaired.
Insurance and Storm Damage Documentation
If the leak is due to storm damage, documenting the issue promptly helps with homeowners’ insurance claims:
- Take clear photos and videos of damaged shingles, flashing, roof holes, and interior water damage.
- Keep receipts for temporary repair materials such as buckets, tarps, roofing cement, roofing tape, or rental fans/dehumidifiers.
- Record the date, time, and weather conditions of the leak.
- Request an inspection report from a licensed roofer for insurance purposes.
These steps can streamline claim processing and increase the likelihood of reimbursement for repairs or storm mitigation.
How to Prevent Future Roof Leaks
Preventing leaks is better than constantly patching them. Simple maintenance can save money and protect your home:
- Inspect your roof twice a year, and after severe storms.
- Keep gutters clean to prevent water pooling and backflow.
- Replace damaged or missing shingles immediately.
- Check flashing around chimneys, skylights, vents, and pipes for cracks or lifting.
- Trim overhanging tree branches that may break or scratch roofing during storms.
Regular maintenance ensures minor issues do not turn into leaks that threaten the interior of your home.
Local Roof Repair Services in Greeneville, TN
For homeowners in Greeneville, TN, Covenant Roofing & Restoration offers reliable roofing solutions:
- Emergency roof inspections and temporary protection.
- Roof leak diagnosis, shingle replacement, and flashing repair.
- Storm damage inspection and insurance claim support.
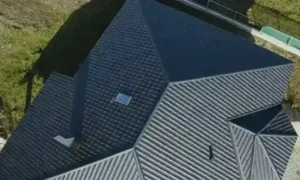
- Full roof replacement for severely damaged or aging roofs.
By contacting a licensed professional early, you reduce the risk of water damage, mold growth, and structural problems. Temporary fixes are only a stopgap, and Covenant Roofing & Restoration ensures your home receives permanent protection.
FAQs About How to Temporarily Fix a Roof Leak
Q1: What is the fastest way to temporarily stop a roof leak?
Move valuables, place buckets, and cover the damaged area with a tarp, roofing cement, or roofing tape if safe.
Q2: Can I temporarily fix a roof leak from inside the attic?
Yes. Place plastic sheeting to divert water, use waterproof tape on small gaps, and catch drips with buckets.
Q3: How long can a temporary roof patch last?
Depends on the material: interior buckets/towels last minutes to hours, tape and cement last 1–3 days, and heavy-duty tarps may last several days until permanent repair.
Q4: Is roofing cement a permanent solution?
No. Roofing cement is a short-term fix to slow leaks and prevent immediate water damage. Permanent repair is required.
Q5: When should I call a roofer?
If leaks continue, ceilings sag, water is near electrical wiring, shingles are missing, or storm damage is present. Immediate professional inspection is recommended.
Q6: Will homeowners’ insurance cover roof leaks?
Storm-related leaks may be covered. Document all damage with photos, videos, and receipts, and provide this to your insurance provider along with a roofer’s inspection report.
Final Thought
A roof leak is stressful, but quick action can minimize damage. Start by protecting your home inside, identifying the likely source safely, and applying a temporary patch that matches the type of damage. Never treat a temporary repair as permanent. For homeowners in Greeneville, TN, Covenant Roofing & Restoration provides professional inspections, emergency storm protection, and permanent roof repair to ensure your home remains safe and dry. Acting promptly reduces risk, prevents costly water damage, and gives peace of mind until the roof is fully restored.