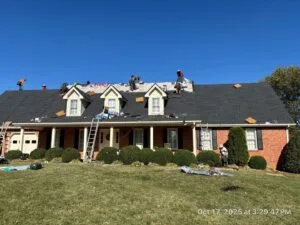
The hammers have finally stopped, the crew has packed up, and your Greeneville home has a fresh new look. While it is tempting to simply write the check and move on, the first few days after a roof replacement are the most important for catching small errors before they become leaks. A new roof is a massive investment, but even the best materials can fail if a single piece of flashing is loose or a vent is blocked. This guide helps you move past the curb appeal and perform a deeper check to ensure the work meets the high standards your home deserves. By following this checklist, you can confirm that your roof is ready to handle the next Appalachian thunderstorm and that your warranty is fully protected.
The Visual Ground-Level Scan: Aesthetics vs. Integrity
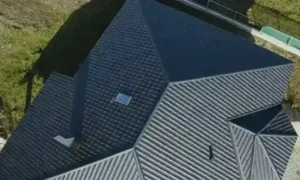
Your first inspection should happen from the safety of the ground. Walk around the perimeter of your house and look at the roof from several different angles. You are looking for a uniform, clean appearance. While new shingles often take a few days of warm Tennessee sun to fully seal and lay perfectly flat, they should already look straight and organized. If you see wavy lines along the rows of shingles, it could indicate that the courses were not snapped with a chalk line or that the shingles were installed over a bumpy, uneven roof deck. These visual cues are often the first sign of a rushed job that might have deeper structural issues.
Shingle Alignment and Uniformity
Take a close look at the horizontal and vertical lines of your shingles. Professional installers use specific patterns to ensure water sheds correctly and the roof looks balanced. If you notice dye lot differences, where one section of the roof looks slightly darker or lighter than the rest, it means the shingles came from different manufacturing batches. While this is sometimes unavoidable, a quality contractor will mix the bundles or alert you beforehand. You should also watch for high nailing, which is when a nail is driven above the reinforced strike zone. From the ground, this might look like a shingle that is slightly popped or sitting higher than the ones around it.
Shingle Overhang and Edge Protection
The edges of your roof are where most water damage begins. Look at where the shingles meet the gutters. There should be a slight overhang, usually between 1/2 inch and 3/4 inch, past the drip edge. If the shingles stop short of the roof edge, water will run down your fascia boards, leading to rot and peeling paint. Conversely, if the overhang is too long (over an inch), the shingles will eventually sag and crack, or high winds may catch them and rip them off. A consistent, even overhang around the entire house shows that the crew took the time to measure and cut with precision.
The Forensic Inspection: Flashing, Seals, and Drip Edges
Once you are satisfied with the look of the shingles, turn your attention to the metal components. These flashing pieces are the most critical part of your roof because they protect the joints and openings where leaks are most likely to start. In Greeneville, our heavy rains and mountain winds put a lot of pressure on these seals. If your contractor reused old, rusty flashing instead of installing new metal, they have left a weak link in your home’s defense. Every vent, chimney, and valley should have fresh, clean metal that is tightly integrated with the new shingles.
| Component | What to Look For | Why It Matters |
| Drip Edge | New metal strips along the eaves | Prevents water from wicking back into the wood deck |
| Pipe Boots | New rubber and metal seals on vents | Prevents leaks around bathroom and kitchen exhausts |
| Chimney Flashing | Step flashing tucked under shingles | Directs heavy rain away from the masonry joints |
| Valley Metal | Clear of debris and properly overlapped | Handles the highest volume of water on the roof |
Drip Edge Installation and Gutter Health
A common shortcut in the roofing industry is skipping the new drip edge. Check the very edge of your roof deck. You should see a new metal L-shaped strip that tucked under the shingles and hangs slightly over the gutter. This piece is vital because it breaks the surface tension of the water and forces it into the gutter rather than letting it soak into the wooden edge of your roof. While you are looking at the edges, make sure your gutters weren’t crushed or bent by heavy ladders during the install. If your gutters were in good shape before the job, they should remain level and functional after the crew leaves.
Flashing and Critical Penetrations
Check the areas around your chimney and any pipes sticking out of the roof. You should see fresh sealant (caulk) that is applied neatly. If the sealant looks gobbed on or messy, it might be hiding a poor fit. Pay special attention to kick-out flashing, this is a small piece of metal where a roof edge meets a vertical wall. It kicks the water away from the siding and into the gutter. Many crews forget this piece, which leads to water getting trapped behind your siding and rotting out your wall studs. At Covenant Roofing & Restoration, we prioritize these small metal details because we know they are the difference between a 5-year roof and a 50-year roof. If your previous contractor cut corners on the flashing, it’s vital to address roofing repairs before the next heavy Tennessee rain causes interior water damage.
Ventilation Verification: Is Your Roof Breathing Correctly?
Proper ventilation is the most overlooked part of a roofing project, yet it is what determines whether your shingles last 30 years or only 10. A roof needs to breathe to prevent heat and moisture from being trapped in your attic. During our Greeneville summers, an unventilated attic can reach temperatures over 150°F, which literally cooks the shingles from the underside. After your install, you should verify that your exhaust vents (like ridge vents or power fans) are working in harmony with your intake vents (the soffit vents under your eaves). If this balance is off, you will notice higher energy bills and potentially a musty smell in your upper floors.
Exhaust vs. Intake Balance
A healthy roofing system follows a simple rule: what goes out must be replaced by what comes in. Check your roofline for the ridge vent, a long, raised strip that runs along the very peak of your roof. However, simply seeing a ridge vent isn’t enough; the crew must have actually cut a gap in the wooden roof deck for air to flow through it. You should also ensure your soffit vents are clear. It is common for roofing debris or loose insulation to accidentally block these intake points during a chaotic tear-off. If air can’t enter at the bottom, it can’t push the hot air out at the top, leaving your attic stagnant and damp.
Baffle Inspection and the 2026 Energy Standard
Modern roofing standards, including the latest manufacturer requirements from brands like GAF or CertainTeed, demand that attic baffles are in place. Baffles are plastic or cardboard channels that keep your insulation from clogging the airflow coming in through the soffits. After a new roof is installed, it is a great idea to peek into the corners of your attic with a flashlight. If you see insulation piled up against the underside of the roof deck, it means your vents are blocked. Keeping these pathways clear is a requirement for most Lifetime warranties, and failing to do so can lead to shingle blistering and premature failure.
The Hidden Attic Check: Looking Behind the Shingles
While the outside of your roof might look perfect, the underside of the roof deck in your attic tells the real story of the installation. This is where you can spot mistakes that are invisible from the street. Many homeowners are hesitant to climb into the attic, but a quick ten-minute check can reveal issues that could save you thousands of dollars in future repairs. You are looking for signs of a clean install, meaning no missing nails, no rotted wood left behind, and no sudden light where it shouldn’t be.
The Daylight Test and Shiners
One of the easiest tests you can do is the Daylight Test. On a bright Greeneville afternoon, turn off all the lights in your attic and look up. Aside from your intentional vents, you should not see any pinpoints of sunlight. If you see light, it means there is a gap or a hole that water will eventually find. While you are up there, look for shiners. A shiner is a roofing nail that misses the wooden rafter and is sticking out into the open attic air. In the winter, these cold nails can collect frost from the rising heat of your home; when that frost melts, it creates a phantom leak that drips onto your ceiling, even when it isn’t raining outside.
Decking Health and Moisture Presence
When a roof is replaced, any rotted or soft wood deck boards should be removed and replaced with fresh plywood or OSB. From inside the attic, you can verify this by looking at the color and texture of the wood. If you see dark, water-stained boards or white fuzzy mold, it means the crew might have shingled over old, damaged wood to save time or money. You should also feel the air; if it feels exceptionally humid or stuffy compared to a week ago, your new ventilation system may not be functioning correctly. Catching these structural issues early ensures that your new shingles are resting on a solid, dry foundation.
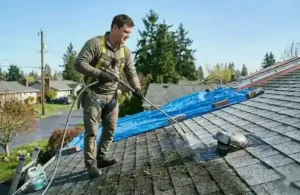
Property Recovery: Was the Cleanup Done Professionally?
A high-quality roofing job doesn’t end on the roof; it ends in the yard. The cleanup process is a major indicator of a contractor’s professionalism and respect for your home. During a tear-off, thousands of old nails and sharp shingle scraps fall from the roof. If these are not managed correctly, your property can become a hazard for children, pets, and your vehicle’s tires. A professional crew should leave your lawn, flower beds, and driveway looking exactly as they did before the work began, with no nightmare cleanup left for you to handle.
The Magnetic Sweep and Yard Safety
The most critical tool for post-project safety is the magnetic sweeper. This is a heavy-duty magnet on wheels that the crew should run over your entire lawn and driveway multiple times. Even the best tarps can’t catch every single fastener. You should walk your property yourself and look specifically in the grass near the eaves and in your flower beds. If you find more than a stray nail or two, the cleanup was not thorough. At Covenant Roofing & Restoration, we perform several passes with a high-powered magnet because we know that a single missed nail can cause a painful injury or a flat tire.
Gutter Scrutiny and Landscaping Protection
Your gutters often take the brunt of the falling debris. After the job, check inside your gutters to ensure they aren’t filled with shingle granules, wood splinters, or old nails. Clogged gutters can lead to water backing up under your new shingles, causing the very leaks you just paid to fix. You should also inspect your shrubs and flower beds. While some dust is normal, your plants shouldn’t be crushed or broken. A quality team uses catch-all netting or plywood lean-tos to shield your landscaping from the impact of falling materials.
Documentation & Warranty: Closing the Project Legally
The final step in your checklist isn’t physical, it’s paperwork. A new roof is only as good as the warranty that backs it up. Many homeowners realize too late that their Lifetime Warranty was never actually registered with the manufacturer, leaving them with no protection if the shingles fail in ten years. You need to ensure that all legal and financial loose ends are tied up before you make the final payment. This documentation is your safety net for the future of your home.
Manufacturer Warranty vs. Workmanship Guarantee
It is vital to understand that you actually have two different warranties. The Manufacturer Warranty (from brands like GAF or CertainTeed) covers defects in the shingles themselves, like premature cracking or granule loss. However, this does not cover mistakes made by the installers. For that, you need a Workmanship Warranty from your contractor. This covers installation errors, such as poorly sealed flashing or incorrect nailing patterns. Ensure you have both of these in writing, including the specific duration of the workmanship guarantee.
| Warranty Type | Provided By | Covers | Typical Length |
| Manufacturer | Shingle Maker (GAF/CertainTeed) | Factory defects, material failure | 25 Years to Lifetime |
| Workmanship | Roofing Contractor | Installation errors, leaks, labor | 1 to 10+ Years |
| Full-System | Manufacturer + Contractor | Total system and labor coverage | 20 to 50 Years |
Permit Closure and The Town of Greeneville
In the Town of Greeneville, a roof replacement requires a building permit and a final inspection by a city official. This is an extra layer of protection for you; it means an unbiased third party has verified that the work meets the 2018 International Residential Code (IRC). Ask your contractor for proof that the permit has been closed and that the final inspection passed. Keeping this documentation is also helpful if you ever decide to sell your home, as savvy buyers in East Tennessee will want to see that your major home improvements were done legally and inspected by the city.
Frequently Asked Questions
Is it normal to see some shingle granules in the gutters after a new install?
Yes, this is called initial shedding. Manufacturers add extra granules to ensure coverage, and these loose pieces naturally wash into the gutters during the first few rains after installation.
How long does it take for new shingles to seal or lay flat?
In warm weather, the adhesive strips usually bond within 48 to 72 hours. If installed during a Greeneville winter, it may take several weeks of sunlight for the shingles to fully seal and lay perfectly flat.
What if I find a leak a week after my new roof is installed?
Contact your contractor immediately to utilize your workmanship warranty. Most post-install leaks are minor issues, like a loose piece of flashing or a seal that needs a quick adjustment.
Should a new roof have mismatched shingle colors?
No, your roof should have a uniform look. Distinct patches of different shades usually mean dye lot batches were mixed, which can hurt your curb appeal and should be addressed by the builder.
How many nails should be in each roofing shingle?
The standard is four nails per shingle, but for the high winds we see in East Tennessee, a six-nail pattern is often used. This extra fastening provides better wind resistance and meets most Lifetime warranty requirements.
The Covenant Final Walkthrough: Our Difference is the Promise
We believe that the best way to ensure quality is to see it for ourselves. At Covenant Roofing & Restoration, we don’t just send a crew and hope for the best. Every project ends with a dual-level inspection where our foreman and project manager perform a final walkthrough of your property. We check the flashing, test the ventilation, and run the magnet one last time. We invite you to join us for this walkthrough so we can answer your questions and show you exactly what was done to protect your home. Our Promise is that we aren’t finished until you are 100% confident in your new roof. Not sure if your recent install was done correctly? Schedule your free quality assessment with our Greeneville team today, and we’ll ensure your home is truly built to last.